

A KVM (Keyboard, Video, Mouse) switch is a hardware device that allows users to control multiple computers using a single set of peripherals (keyboard, monitor, and mouse). By connecting keyboards, monitors, and mice from multiple computers to the KVM switch, users can switch between them seamlessly, either through the press of a button or using keyboard hotkeys. KVM switches are commonly used in environments where users need to manage and control multiple computers efficiently, such as data centers, server rooms, and multimedia production setups. They help streamline workflow, reduce clutter, and save space by eliminating the need for separate peripherals for each computer.
Identify Your Needs: Begin by assessing your requirements and objectives. Determine how many computers you need to control, the types of peripherals you’ll be using, and any specific features or functionalities you require from the KVM switch.
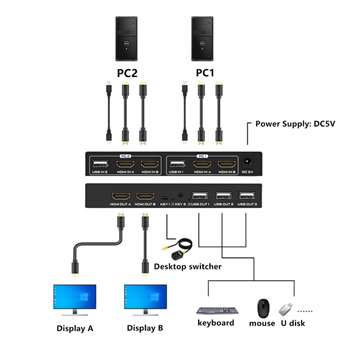
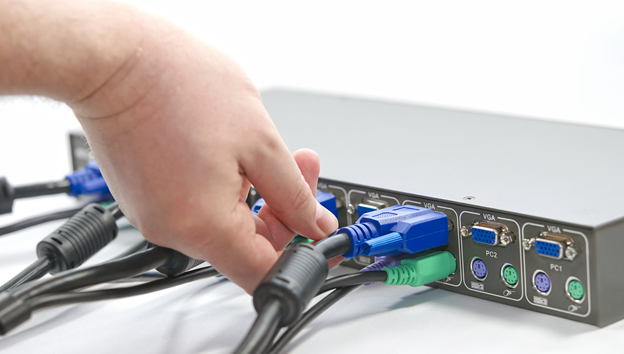
Consider Port Requirements: Evaluate the number and types of ports needed to connect your computers and peripherals. Ensure the KVM switch has sufficient ports for all your devices, including USB, VGA, HDMI, DisplayPort, and audio ports, depending on your setup.
Compatibility: Check compatibility with your computers and peripherals, including operating systems, monitor resolutions, and keyboard/mouse types. Ensure the KVM switch supports the devices you intend to connect without compatibility issues or performance limitations.
Assess Switching Methods: Determine your preferred method of switching between computers. KVM switches offer various switching options, including manual push-button switches, keyboard hotkeys, on-screen display (OSD) menus, and remote control. Choose the method that best suits your workflow and convenience.
Evaluate Scalability: Consider future scalability and expansion needs. Choose a KVM switch that can accommodate additional computers or peripherals if your requirements change or grow over time. Look for modular or expandable designs that allow easy upgrades or additions.
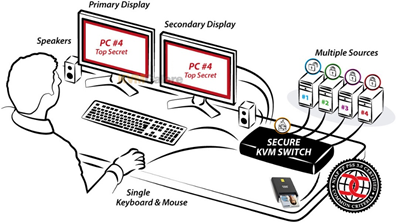
Security Features: If security is a concern, opt for a KVM switch with advanced security features such as port locking, user authentication, and data encryption. Ensure the KVM switch meets industry standards and compliance requirements for data protection and access control.
Manageability and Control: Assess management and control capabilities offered by the KVM switch. Look for features such as remote access, network connectivity, and management software integration that enable centralized monitoring, configuration, and control of multiple computers from a single interface.
Budget Considerations: Set a budget and compare pricing among different KVM switch models. Consider the total cost of ownership, including initial purchase price, maintenance, and support costs. Balance your budget constraints with the features and performance requirements of the KVM switch.
Read Reviews and Recommendations: Research customer reviews, testimonials, and recommendations from trusted sources to gain insights into the performance, reliability, and user experience of different KVM switch models. Pay attention to feedback related to compatibility, ease of use, and customer support.
Vendor Support and Warranty: Choose a reputable vendor or manufacturer that offers reliable customer support, technical assistance, and warranty coverage. Ensure the KVM switch comes with adequate warranty protection and responsive support services to address any issues or concerns.
Preparing Cables, Adapters, and Hubs for Seamless Connectivity:
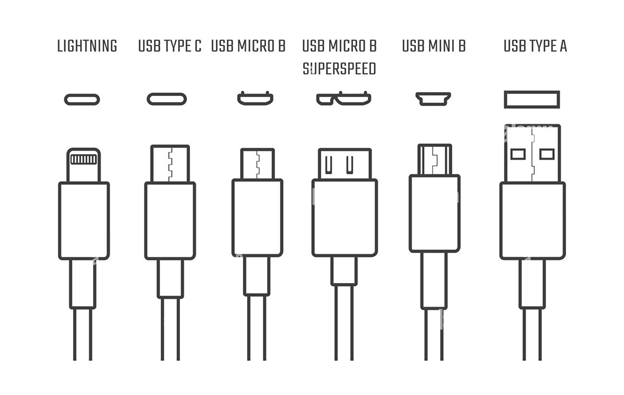
Preparing cables, adapters, and hubs is a crucial step in establishing a smooth and efficient connectivity setup. First and foremost, it’s imperative to assess your connectivity needs by considering the types of devices you’ll be connecting and the required connections, such as HDMI, USB-C, or Ethernet. Once you’ve determined your requirements, gather the necessary equipment, including cables, adapters, and hubs, ensuring compatibility with your devices and operating systems.
Assessing Connectivity Needs and Gathering Equipment:
Equipment gathered, the next step is to carefully inspect each cable and adapter for any signs of damage or wear. It’s essential to check connectors for cleanliness and ensure they’re not bent or damaged, replacing any faulty components to prevent connectivity issues down the line. Additionally, organizing and labeling cables and adapters can help streamline the setup process, preventing tangles and confusion during installation and troubleshooting.
Inspecting and Organizing Cables and Adapters:
After ensuring the quality and organization of your cables and adapters, it’s time to plan the routing of cables to minimize clutter and optimize workspace efficiency. Consider the layout of your devices, available ports, and cable lengths when planning the routing, and use cable management solutions such as cable trays or clips to keep cables tidy and out of the way. Once cables are routed, secure connections and perform a thorough test to ensure all devices are connected and functioning correctly.
Routing Cables, Securing Connections, and Documentation:
Finally, documenting the setup by creating a diagram or list detailing the connections between devices, cable types, and adapter usage can be invaluable for troubleshooting and future reference. By following these steps to prepare cables, adapters, and hubs, you can establish a well-organized, reliable, and efficient connectivity solution for your devices, laying the foundation for seamless connectivity and enhanced productivity.
Connecting to Your USB Peripherals
Assess Compatibility and Requirements: Begin by ensuring that your devices are compatible with each other and have the necessary ports and connections. Check for compatibility with cables, adapters, and ports to avoid any potential issues during setup.
Gather Necessary Equipment: Collect all the cables, adapters, and hubs required to establish connections between your devices. Make sure you have the appropriate cables for each device, including HDMI, USB, Ethernet, or DisplayPort cables, and any necessary adapters to bridge connectivity gaps.
Identify and Connect Ports: Familiarize yourself with the ports and connections on each device. Connect the power cables first, then establish video output by connecting your computer or media device to the display using the appropriate cable. Follow this by connecting audio cables if required and plugging in peripheral devices such as keyboards, mice, printers, or external storage.
Establish Network Connectivity: If internet access is needed, connect your device to the network router or modem using an Ethernet cable. Ensure a secure connection between your computer or media device and the router to enable internet access.
Test and Optimize: Power on your devices and test the connections to ensure they are functioning correctly. Troubleshoot any issues that arise during testing, and optimize cable management by organizing and securing cables to minimize clutter and improve workspace efficiency.
Powering Up the KVM Switch
Power Up: Turn on the KVM switch and all the computers connected to it. Allow them to boot up completely before proceeding to the next step.
Testing the KVM Switch
Testing the KVM (Keyboard, Video, Mouse) switch is a crucial step to ensure that all connected devices are functioning correctly and that seamless switching between them can be achieved. Start by powering on the KVM switch and all connected computers. Use the designated switching buttons or keyboard hotkeys to toggle between different computers and verify that the corresponding video output, keyboard, and mouse inputs are properly switching. Test each connected device individually to confirm that they are recognized and responsive when selected through the KVM switch. Additionally, check for any latency issues or signal degradation during switching transitions. If the KVM switch supports additional features such as audio switching or USB peripheral sharing, test these functionalities as well to ensure they are functioning as expected. Performing thorough testing ensures that the KVM switch is operating correctly and can effectively facilitate multi-computer control, enhancing workflow efficiency and productivity.
Conclusion
KVM (Keyboard, Video, Mouse) switches offer a versatile solution for managing multiple computers efficiently from a single workstation. These devices streamline workflow by allowing users to switch between different computers seamlessly, reducing clutter and maximizing productivity. By assessing compatibility, gathering necessary equipment, and establishing connections, users can create a seamless computing environment tailored to their needs. Additionally, thorough testing ensures that the KVM switch functions properly and can effectively facilitate multi-computer control. With features such as keyboard hotkeys, audio switching, and USB peripheral sharing, KVM switches offer enhanced functionality and convenience for diverse computing setups. Overall, KVM switches serve as indispensable tools for optimizing workflow efficiency and simplifying multi-computer management in various professional and personal settings.

 switch is a hardware device that allows users to control multiple computers using a single set of peripherals (keyboard, monitor, and mouse).)